
UPDATE 5/4/12
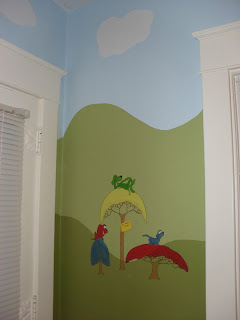
We finished the majority of the painting in Grayden's room last summer, but didn't upload any pictures. Sorry! I still have some characters to add and some to paint over. But here you go...


UPDATE 6/1/11
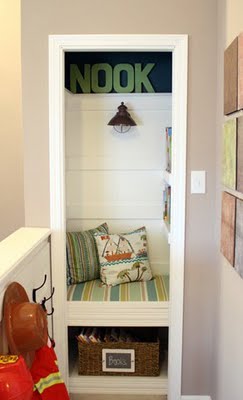
We have gotten a little more painting done... but what's great is that Don has started framing in Graydens closet for his shelves and his Book Nook!
It's been really hard getting anything done... especially since we want to keep this new room a secret from Mr. Grayden. He is going to LOVE it when it is all done.
Check out some of the new pictures!


 View from inside the closet looking towards the room.


Inside the attic space.


Below is the Book Nook Inspiration. I thought it would be cool to put it in his closet. All little kids like to have a "hiding place". This will be awesome!


UPDATE 5/17/11
We have made some progress on Grayden's room... check it out!
We got all the walls mudded and sanded and we got everything taped and backfilled (don's painter lingo!).


 Some Dr. Seuss references!
 And the painting begins!

 I was in charge of rolling the blue after don cut it in.
I did a mighty fine job, if I do say so myself!


 This is Don going back over what I did...not up to his standards!
 Bring on the Green Seuss like hills!


 Ok, so maybe I didn't do such a great job after all. I had a few bumps on the ceiling with the roller. Oops!


 Yay! It's starting to come together!!!!

UPDATE:
We finished the majority of the painting in Grayden's room last summer, but didn't upload any pictures. Sorry! I still have some characters to add and some to paint over. But here you go...


Here are some before and afters...


UPDATE 6/1/11
We have gotten a little more painting done... but what's great is that Don has started framing in Graydens closet for his shelves and his Book Nook!
It's been really hard getting anything done... especially since we want to keep this new room a secret from Mr. Grayden. He is going to LOVE it when it is all done.
Check out some of the new pictures!
Grayden's Closet


Attic space behind the closet. Some day, Don wants to turn this into a little club house.

Inside the attic space.

Closet... framing is started...


Book Nook Bench Framed...


Below is the Book Nook Inspiration. I thought it would be cool to put it in his closet. All little kids like to have a "hiding place". This will be awesome!

Below are some updated painting pictures...


UPDATE 5/17/11
We have made some progress on Grayden's room... check it out!
We got all the walls mudded and sanded and we got everything taped and backfilled (don's painter lingo!).


I did a mighty fine job, if I do say so myself!


UPDATE:
We have picked a new and fun theme for Grayden's room!
Dr. Seuss!
Isn't that exciting!

6/19/10
We finally have found some time to start on Grayden's room! Here are some of the before pictures...


We moved everything out and into one of the spare bedrooms started taking down all of the trim around the top of the room.


After the trim was up we were able to start patching some of the cracks in the walls and ceiling.


The next step is to sand and then skim the walls so they are smooth (hopefully!)